

How To Animate In The Real World
Animate characters into real-world scenes
Have you ever seen a commercial where an blithe character is painted onto a real background and wondered how it was done? Using a brick wall instance, I'll bear witness you the techniques needed to animate a character into a real-life scene - without making a mess or getting your hands dirty with paint. I'll likewise share some tips for making your character seem as though it has been painted direct onto its background.
For this tutorial nosotros will be using After Effects and some blended tricks - such every bit blending modes, alpha mattes and simple expression techniques - to achieve a realistic look in your blitheness. Once mastered, you'll be able to apply the same processes to your own graphic symbol animations and to more than circuitous projects.
Click here to download the support files (69.2MB)
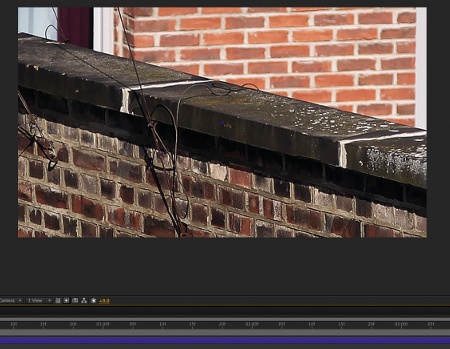
01 Open After Effects, unzip the support files and open main.aep from the After Effects folder. Create a new composition at 1024x576 pixels, 25fps and 3 seconds long, and proper noun it 'Character On Wall'. The size and frame rate is important equally we'll be working with television resolution. When y'all're set up, drag background_plate.tif and Character_Animation.mov from the Assets folder in the Project Panel over to your timeline.

02 Next, we volition scale background_plate to about 50% (keyboard shortcut: S) and change the position of information technology and so nosotros tin can run into the wall where we will add the animation.
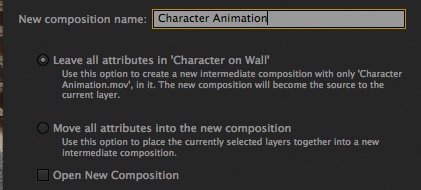
03 Let's pre-compose the Graphic symbol Blitheness.mov layer (Ctrl/Cmd+Shift+C). Exit the choice 'Leave all attributes in "Character on Wall"' selected, and change the proper noun to Character Animation. It's important to pre-compose the animation, and so in the future we tin can change the animation without loosing everything. But earlier we move to the interesting part, let's scale the comp to about 70%, so we can fit it to the wall.
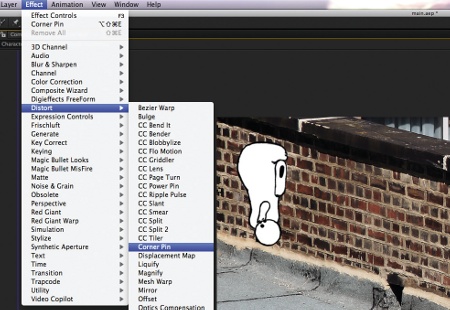
04 With the Character Animation selected, add a Corner Pin effect (Effects>Distort>Corner Pivot). Corner Pin volition add one pin in each corner of the layer. We will change only the position of the Y axis of each pin. You can use the lines of the brick wall as a reference to have the pins on the same level. Information technology'south really important to have the pins aligned on the aforementioned line of the brick wall otherwise the distortion won't look right.
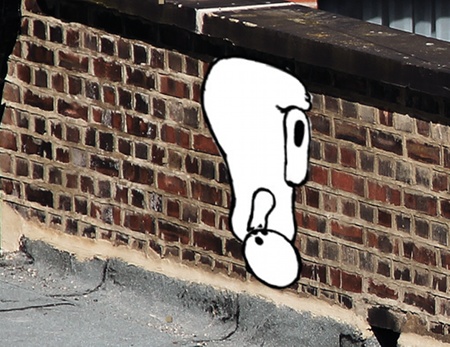
05 At present that we have the blitheness at the right angle, we can change the position of background_ plate.tif layer to your preferred initial position for the start of the video. We tin can likewise change the position and scale of the Graphic symbol Animation to fit it nicely to the frame. For my project, I scaled the Graphic symbol Blitheness back to 90%.
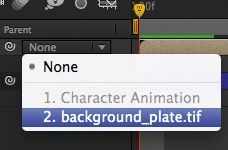
06 Select the Graphic symbol Animation and permit's parent it to the background, and so we can animate it and go far more interesting. To do that, go into the Parent cavalcade and change it from None to the layer you want. With the Character Animation layer parented, let'south add together i position keyframe on Frame 12, and on Frame 45 let'due south move the background to fake a camera move.
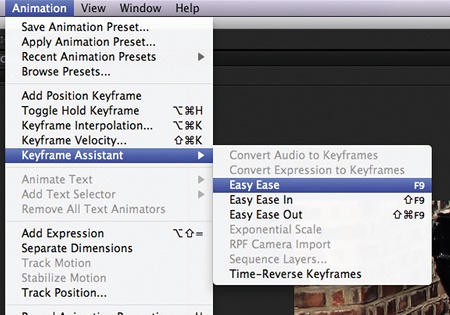
07 Select the keyframes that we merely created and add an Easy Ease to them (Animation>Keyframe Assistant>Easy Ease). This volition assistance smooth the keyframes of the blitheness. To make information technology a bit more real, we will add a simple jerk expression to the position holding of the background. Alt/Opt+click on the Stopwatch symbol next to the position. In the Expression Box, enter the code: jerk (iii,5) to make information technology shake a fleck.
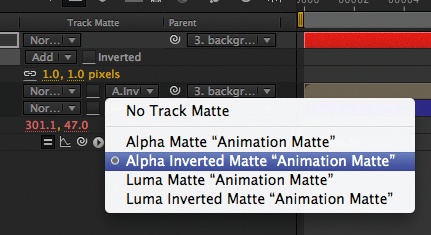
08 The top of the animation is going to come off the brick wall, and then to prepare it nosotros'll create a solid (Layer>New>Solid) and proper name information technology Animation Matte. It can be any colour. Then brand a mask to cover the outside area of the brick wall, and add 1 pixel of plume. Select the Character Blitheness Layer, and in the Track Matte dialogue choose 'Alpha Inverted Matte "Animation Matte"'. I used Runway Matte here because the Corner Pin effect changes the perspective of the layer, making it a scrap tricky to mask.
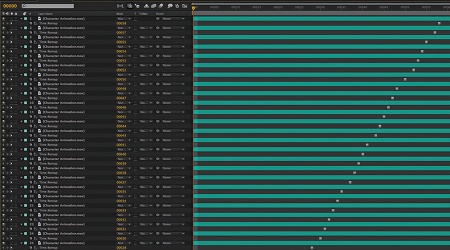
09 For the white paint we will duplicate the Character Blitheness Composition (Ctrl/Cmd+D) and named information technology 'White Animation'. Open the composition and duplicate the Character Animation layer 35 times (because we take 35 animated frames). To freeze the layers one by one, select layer 35 and on the first frame of the Limerick get to Layer>Time>Freeze Frame. Go to the adjacent blitheness frame and freeze the layer above, and carry on until you have one blitheness frame for each layer.
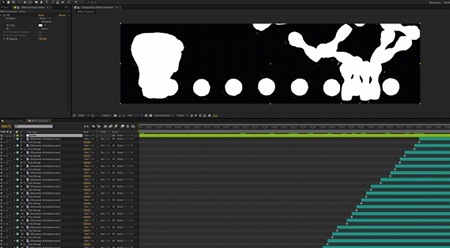
10 At present we volition ingather the beginning of each layer. Select all the layers (Ctrl/ Cmd+A) and press U on your keyboard to show all the keyframes. In each layer, go to the frame where the keyframes are, and ingather it (Alt/Opt+[). To finish this part, add together an Aligning Layer on tiptop of all the layers to affect those underneath (Layer>New> Adjustment Layer), name it 'white' and add together a white make full issue (Effect>Generate>Fill).
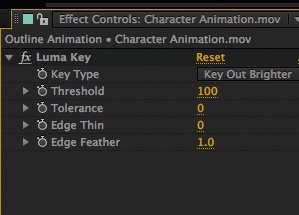
xi Next, we will make the outlines, so duplicate the White Animation Composition and proper name information technology 'Outline Blitheness'. Open the Composition and delete the adjustment layer, every bit we demand to apply the new event to each layer individually to be able to see all the outlines. To central the white out, nosotros will employ Luma Fundamental (Result>Keying>Luma Key). Alter Key Type to Key Out Brighter, Threshold to 100, and Edge Plumage to one. Re-create the Event and paste to all layers.
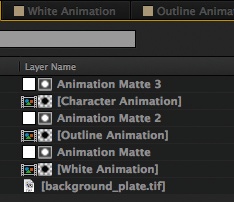
12 Select the Matte and the Animation layers on the Grapheme On Wall composition and duplicate twice (Ctrl/Cmd+D). Select the terminal pre-comp (layer 6) and, holding Alt/Opt, elevate the White Blitheness limerick from the Project panel and drib it on top of layer half dozen in the timeline. It will change the layer for the new one, keeping all the current attributes. Do the same with Outline Animation, but drop it onto the pre-comp that you take on layer 4.
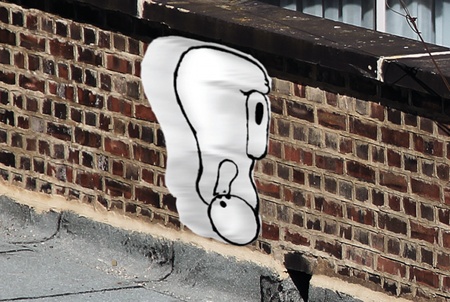
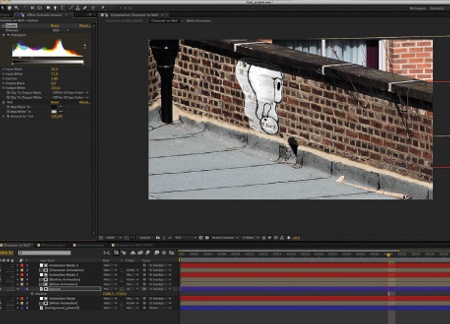
13 Now add together a fast blur to the Outline Animation layer (Effect>Blur & Sharpen>Fast Mistiness) with a Blurriness of 20, and change Blur Dimensions to Horizontal. Bring the Opacity of the layer down to 30% to make it look more existent. To the Character Animation layer we will copy (Ctrl/ Cmd+C) the Luma Central upshot from the layer of the Outline Blitheness composition and paste (Ctrl/Cmd+P) it on, so nosotros have just the outlines.
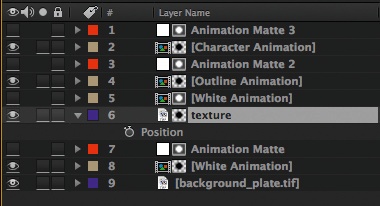
fourteen We now demand to bring some texture from the brick wall dorsum, to make it expect more than realistic. Duplicate the background_plate.tif layer (Ctrl/Cmd+D), name it 'texture' and move it above the White Animation layer and the Matte layer. On the first frame of the limerick, delete the wiggle expression and all the position keyframes by selecting the expression text and pressing delete on your keyboard. Then parent the layer as we did before to the background_plate.tif, then that they have the aforementioned animation.
15 Side by side, equally we did before when masking, duplicate the White Blitheness layer and use Alpha Matte for the texture. On the texture layer, add a Level effect (Upshot>Colour Correction> Level) and a Tint effect (Effect> Color Correction>Tint). For Level, fix Input Blackness to 26, Input White to 71 and Gamma to 2.eight, and for Tint set Map White to R-207, G-193 and B-181. And to end, change the blending manner of the layer to Pin Calorie-free and then it looks more realistic.

Thank you for reading five articles this month* Bring together at present for unlimited admission
Relish your commencement month for just £1 / $1 / €1
*Read 5 free manufactures per month without a subscription
Join at present for unlimited access
Effort get-go month for merely £1 / $i / €ane
Related articles
Source: https://www.creativebloq.com/after-effects/animate-characters-real-world-scenes-6118638
Posted by: howletthanceseles1941.blogspot.com
0 Response to "How To Animate In The Real World"
Post a Comment